
XENARO GDP 5100 - DVD player GRUNDIG - Free user manual and instructions
Find the device manual for free XENARO GDP 5100 GRUNDIG in PDF.
| Product type | DVD player |
| Brand | Grundig |
| Model | XENARO GDP 5100 |
| Dimensions (W x D x H) | 43 x 24 x 5 cm |
| Weight | 2.1 kg |
| Power supply | 230 V, 50 Hz |
| Power consumption | 15 W (standby < 1 W) |
| Supported formats | DVD, DVD±R/RW, CD, CD-R/RW, MP3, JPEG, DivX |
| Main functions | DVD playback, zoom, slow motion, fast forward, programming, repeat |
| Video outputs | HDMI, SCART, composite (RCA), S-Video |
| Audio outputs | Stereo RCA, digital coaxial, optical |
| Additional features | Progressive scan, parental control, last position memory |
| Maintenance and cleaning | Clean with a soft dry cloth. Do not use abrasive products. |
| Safety | Do not expose to moisture. Unplug before cleaning. Use in a well-ventilated area. |
| Spare parts and repairability | Laser lens and optical unit available at authorized service center. Repairability index: 7.4/10 |
| General information | 2-year warranty. Made in Europe. Manual available in PDF. |
Frequently Asked Questions - XENARO GDP 5100 GRUNDIG
User questions about XENARO GDP 5100 GRUNDIG
0 question about this device. Answer the ones you know or ask your own.
Ask a new question about this device
Download the instructions for your DVD player in PDF format for free! Find your manual XENARO GDP 5100 - GRUNDIG and take your electronic device back in hand. On this page are published all the documents necessary for the use of your device. XENARO GDP 5100 by GRUNDIG.
USER MANUAL XENARO GDP 5100 GRUNDIG
4 GDP 5100 DVD player
Special features of your DVD player
Packing contents
Guarantee
5 Set-up and safety
6 Overview
The front of the DVD player
The back of the DVD player
The display elements of the DVD player
The remote control
9 Connection and preparation
Connecting the television
Connecting to a HiFi system with analog two-channel stereo sound
Connecting the power cord
Inserting batteries in the remote control
11 Operation
Setting the language
Adapting the DVD player to the television set
12 DVD/VIDEO CD playback
DVD and video CD features
Special DVD features
Before playback
Playing back a title
Calling up information
Selecting titles or chapters
Selecting chapters
Interrupting and resuming playback
Ending playback
Removing the DVD/video CD
Additional playback functions
Selecting and playing scenes
18 MP3 CD playback
20 AUDIO CD playback
Audio CD features
Before playback
Audio functions
CONTENTS
22 Parental lock
Locking and releasing the disc tray of the DVD player Authorising the contents of a DVD
24 Sound settings
Surround sound settings
25 Picture settings
Selecting the picture format for your television Selecting filter functions
27 Custom settings
Settings in the »Player menu« menu Selecting the language of the screen menu Setting the TV system Setting the screen menu and the display of the DVD player Language settings
30 Using external devices
Connecting to a digital multi-channel amplifier Connecting to a HiFi system with digital two-channel stereo sound (PCM) Adapting the digital output to the digital multi-channel amplifier Adapting the analogue output to the HiFi system
34 Television remote control
35 INFORMATION
Technical data General instructions for laser devices Rectifying minor problems Cleaning CDs and DVDs GRUNDIG Service
GDP 5100 DVD PLAYER
Special features of your DVD player


Your DVD player gives you perfect digital video playback in studio quality.
It also provides superb cinema-quality audio playback – in stereo or with digital multi-channel sound – depending on the type of DVD and the HiFI system or stereo television.
Other features of DVD video include the choice of audio channel and language, choice of subtitle language, and various camera recording angles.
In addition to DVDs, your DVD player can also play MP3, video and audio CDs.
Your DVD player is suitable for DVDs with regional code 2.
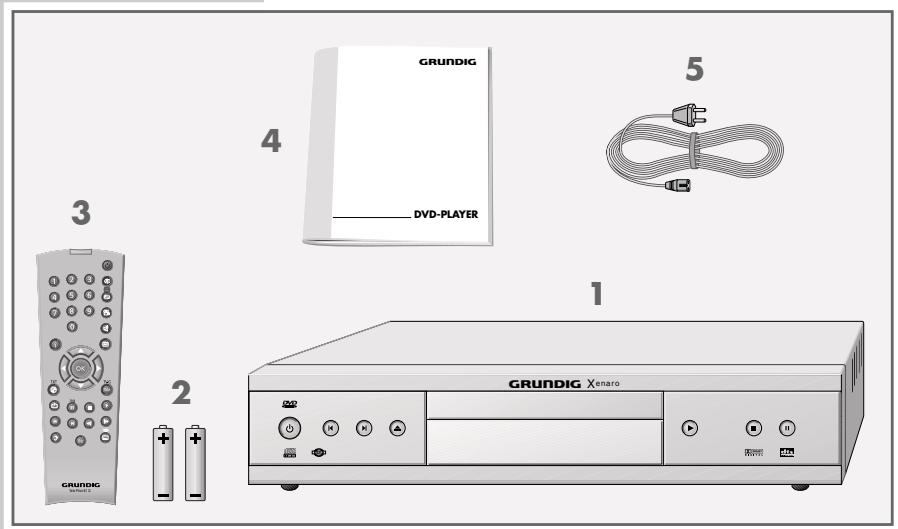
Packing contents
text_image
GRUNDIG DVD-PLAYER 1 2 3 4 5 GRUNDIG Xenaro1 GDP 5100 DVD player
2 2 batteries, 1.5 V-, mignon type
3 Remote control
4 Operating manual
5 Power cord
Guarantee:
We wish to point out explicitly that only operating software authorized by GRUNDIG is permissible for the DVD player. You can obtain this software from your dealer, or in the near future from the Grundig Websites www.grundig.com or www.grundig.de. Any instance of operating software from a dubious Internet source being loaded into the device will impair functioning and also, due to unauthorized intervention, invalidate any claims under the guarantee. As a rule, GRUNDIG declines to refund any costs resulting in such cases. Any repair costs thus due, even those occurring within the guarantee period, are to be paid by the customer.
SET-UP AND SAFETY
text_image
2h STOP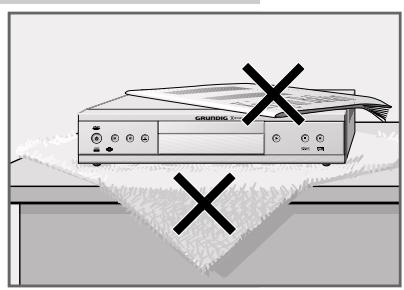
natural_image
Illustration of a computer monitor with a close button and 'CNAMING 3' label, no readable text or symbols present.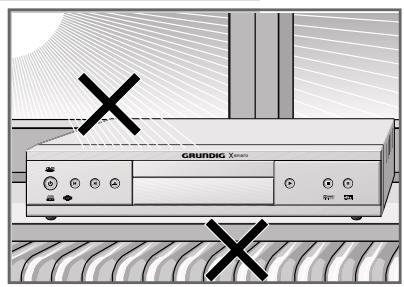
text_image
GRUNDIG X® X®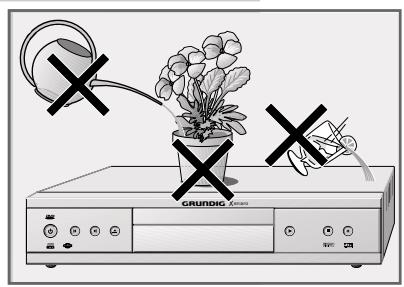
natural_image
Illustration of a portable electronic device with a potted plant and two crossed X marks, no text or symbols present.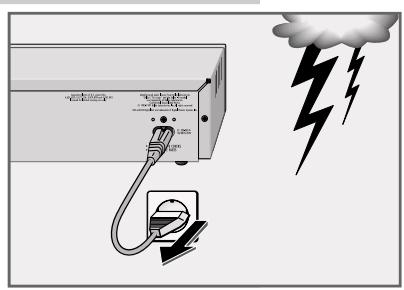
text_image
Diagram illustrating a lighting or ventilation system with labeled components and lightning bolt symbol
natural_image
Abstract black-and-white graphic of a stylized bird or creature with a cloud-like shape inside, no text or symbols present.Please note the following points when setting up the DVD player:
This DVD player set is designed to play video and audio signals from compact discs (DVD and CD).
Any other use is expressly prohibited.
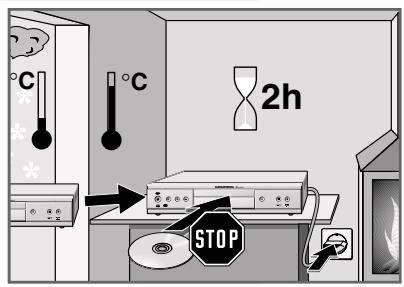
If the DVD player is subject to a sudden change in temperature, for example if brought in from the cold to a warm room, connect it to the mains supply and let it stand for at least two hours before you insert a DVD.
The DVD player is designed for use in dry rooms. If you do use it in the open, please ensure that it is protected from moisture, such as rain or water splashes.
Place the DVD player on a hard, level surface. Do not place any objects such as newspapers on the DVD player or any cloth or similar articles underneath it.
Do not place the DVD player close to heating units or in direct sunlight, as this will impair cooling.
Do not insert foreign objects in the air vents or the disc compartment.
Never open the DVD player casing under any circumstances. The manufacturer accepts no liability for damage resulting from improper handling.
Do not place any vessels such as vases on the DVD player, as they may spill liquid, thus presenting a safety risk.
Thunderstorms are a danger to all electrical devices. Even if the DVD player is switched off, it can be damaged by a lightning strike to the mains. Always remove the mains plug during an electrical storm.
If the DVD player is unable to scan DVDs or CDs perfectly, use a standard commercial cleaning CD to clean the laser optics. Other cleaning methods may damage the laser optics.
Always keep the disc compartment closed to prevent dust from collecting on the laser optics.
This DVD player is designed to the highest technological and environmental standards. Only ecologically compatible, high quality materials have been used. The batteries included are free of mercury and cadmium.
The range of materials used has been deliberately restricted and all the larger plastic parts have been labelled. This DVD player is easily disassembled to make servicing easier and optimise recycling.
The front of the DVD player
text_image
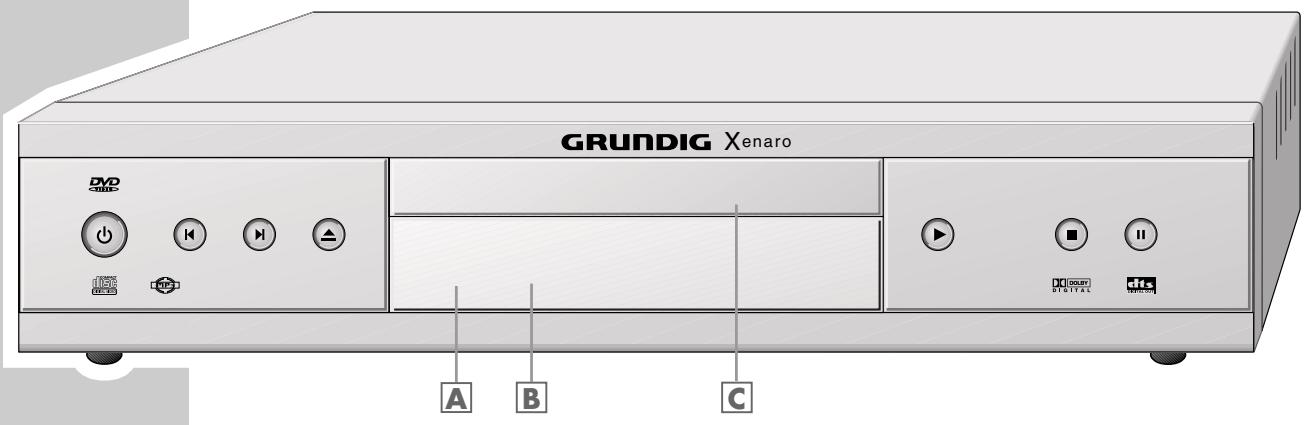
GRUNDIG Xenaro DVD A B CSwitches the DVD player to and from stand-by mode.
Switching the DVD player off does not mean it is disconnected from the mains.
Selects the previous title or section during playback.
Press and hold down to switch to reverse frame search during playback (20-speed).
▶ Selects the next title or section during playback.
Press and hold down, switches to forward frame search during playback (20-speed).
▲ Opens and closes the disc compartment.
A Stand-by indicator.
B Display.
C Compartment for DVDs/CDs.
Starts playback.
Press and hold down (4 seconds) to switch the video strobe function on.
Press once to activate the "RESUME" function.
Press twice to switch to "STOP" mode.
Press once to pause.
Press twice to advance the picture playback frame by frame.
Press and hold down to start the playback at half speed (slow motion).
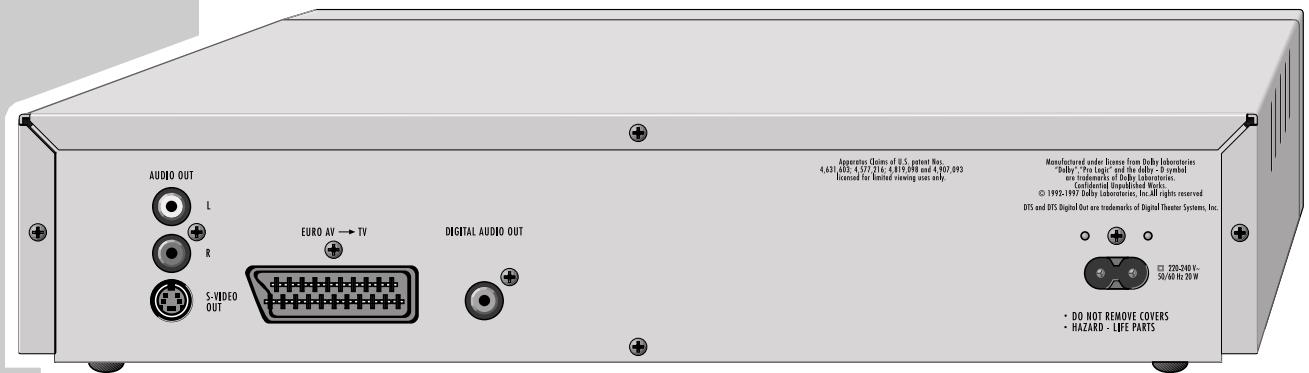
The back of the DVD player
text_image
AUDIO OUT L R S-VIDEO OUT EURO AV → TV DIGITAL AUDIO OUT Apparates Claims of 0.5 patent Nos. 4,631,633 - 4.577/316: 4.819,998 and 4.907,993 licensed for limited viewing uses only. Manufactured under license from Dolly laboratories "Dolly" "Pro Legit" and the dollar - 3 symbol are trademarks of Dolly laboratories. Confidential Unpublished Works. © 1992-1997 Dolly laboratories, Inc.AIRI rights reserved DTS and DTS Digital Out are trademarks of Digital Theater Systems, Inc. ☐ 720-240 V- 50/60 Hz 20 W • DO NOT REMOVE COVERS • HAZARD - LIFE PARTS| AUDIO OUT L R | Audio output jacks (left/right channel) for connection to a HiFi system. |
| S-VIDEO OUT | Video-output jack for connecting a television set with an S-VHS jack. |
| EURO AV → TV | Video/audio output jack for connecting a television set. |
| DIGITAL AUDIO OUT | Audio output jack (coaxial) for PCM/MPEG2/AC3/DTS signals, for connecting a digital multichannel audio/video amplifier. |
| 220-240V~ 50/60Hz 20W | Socket for power cord. |
Caution:
Do not connect any devices while the DVD player is switched on. Never touch the inside of the sockets and plugs of the connecting cables. An electrostatic discharge can damage the DVD player.
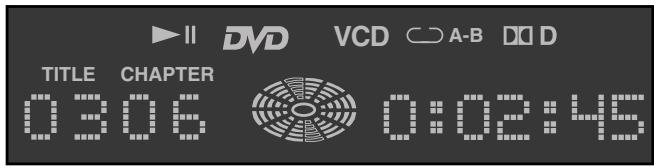
The display elements of the DVD player
text_image
DVD VCD A-B D D TITLE CHAPTER 0306 0:02:45| »▶« | Playback. |
| »‖« | Pause/Freeze-Frame. |
| »DVD « | DVD inserted. |
| »VCD« | VCD inserted. |
| »○ A-B« | One of the Repeat functions is activated. |
| »DD« | The DVD provides a Dolby Digital audio signal. |
| »☐ / TITLE« | Number of the title on a DVD. |
| »☐ / CHAPTER« | Number of the section on a DVD or CD or the track on a music CD. |
| » [icon] « | Function display for playback, pause, search etc., switched off on delivery. |
| »☐: 00: 00« | Total or elapsed playing time in hours, minutes and seconds. |
text_image
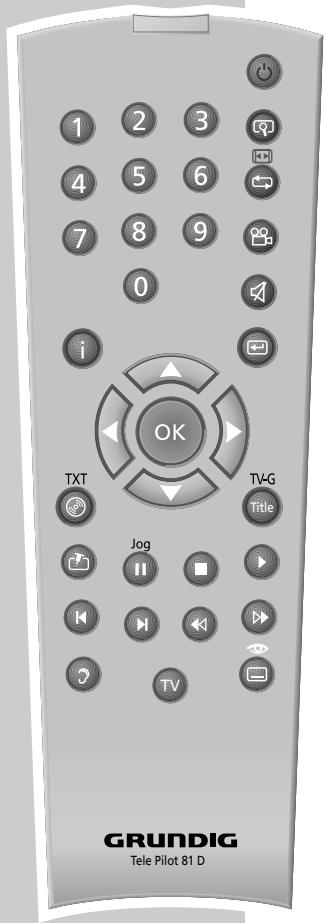
1 2 3 4 5 6 7 8 9 0 i OK TXT Jog TV-G Title TV GRUNDIG Tele Pilot 81 DThe remote control
Switches the DVD player on from stand-by mode (the red indicator on the DVD player is lit) and off again (stand-by).
1 ... 0 Numeric keys for various inputs.
Zooms in on scenes during playback.
For marking and repeating sections on DVDs and video CDs or tracks on audio CDs.
Selects various camera angles for certain scenes or passages on the DVD during playback.
i Calls up the DVD player menu.
Switches the sound of the television set off (mute).
Quits the menu or returns to the previous menu level.
▲▼ Select various functions in the menus.
Select various functions in the menus; »◀« quits the menu or returns to the previous menu level.
OK Displays various information on the television screen during playback, such as the title or chapter number and playing time. Confirms selections made from the menus.
Calls up the disc menu of the DVD/video CD during playback; switches the content menu of a MP3 CD on and off.
Title Calls up the title menu of a DVD during playback; calls up the info menu of a MP3 CD.
Marks scenes on a DVD.
Freeze-frame for DVDs and video CDs. Pause for audio CDs Press and hold down for slow motion (DVD).
Interrupts the currently running function.
Starts playback.
Selects the previous title or section during playback.
▶ Selects the next title or section during playback.
Switches to reverse frame search at various speeds during playback.
Switches to forward frame search at various speeds during playback.
3 Switches between the original and the dubbed language during DVD play-back.
TV Switches the remote control from video recorder operation to TV operation, see the options described on page 34.
For selecting and displaying subtitles on the DVD during playback.
CONNECTION AND PREPARATION
Connecting the television ...
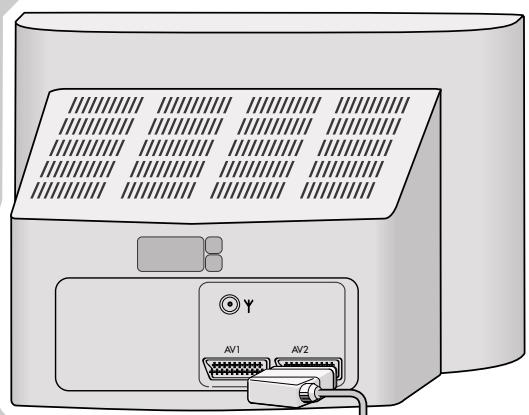
natural_image
Illustration of a portable electronic device with two labeled ports (AV1 and AV2) and ventilation grille, no text or symbols present.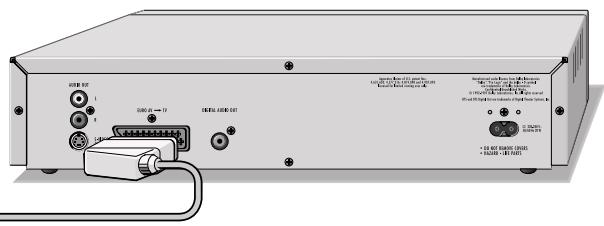
text_image
电源 127 I 8 COM/PLA-79 接线机 (USB port) 100 * 100 MHz (500 MHz) * 100 MHz (100 MHz)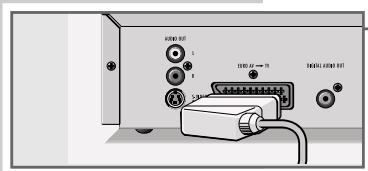
text_image
AVERAGE BOX 1 2 3 4 5 6 7 8 9 10 11 12 13 14 15 16 17 18 19 20 21 22 23 24 25 26 27 28 29 30 31 32 33 34 35 36 37 38 39 40 41 42 43 44 45 46 47 48 49 50 51 52 53 54 55 56 57 58 59 60 61 62 63 64 65 66 67 68 69 70 71 72 73 74 75 76 77 78 79 80... using a EURO-AV cable
1 Plug a standard EURO-AV-cable into the »EURO AV → TV« socket on the DVD player and the appropriate socket (AV 2) on the television set.
Note:
If the DVD player is connected via the »EURO AV → TV« socket, you must carry out the setting described in "Selecting the video output socket (RGB or S-Video)" on page 11.
text_image
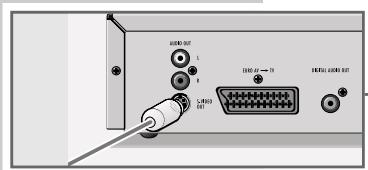
USB1.00 USB2.00 USB3.00... using a Y/C cable (S-VHS) and cinch cable
1 Plug a standard Y/C cable into the »S-VIDEO OUT« socket on the DVD player and into the appropriate socket (S-VIDEO IN) on the television.
2 Plug a standard cinch AV cable into the »AUDIO OUT L R« sockets on the DVD player and the appropriate sockets (AUDIO IN) on the television.
Note:
If the DVD player is connected via the »S-VIDEO OUT« socket, you must carry out the setting described in "Selecting the video output socket (RGB or S-Video)" on page 11.
If the DVD player is connected to a television set with a 16:9 format, observe the settings described in the "Selecting the screen format of the television" section on page 11.
The colour norm of the DVD player's screen menus has to be adapted to the format of the television. Make sure to observe the settings described in the "Setting the TV system" section on page 27.
For information on connecting a HiFi system with analogue two-channel stereo sound, see page 10. For information on connecting a digital multi-channel amplifier or a HiFi system with digital two-channel stereo sound, see page 30.
text_image
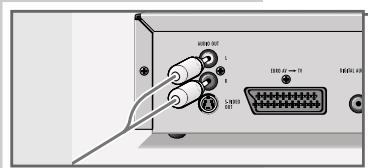
2010.06 A 2010.06 1000.06 1000.06Connecting to a HiFi system with analogue two-channel stereo sound
As an alternative to using the television's speakers, the sound can also be played back through a HiFi system.
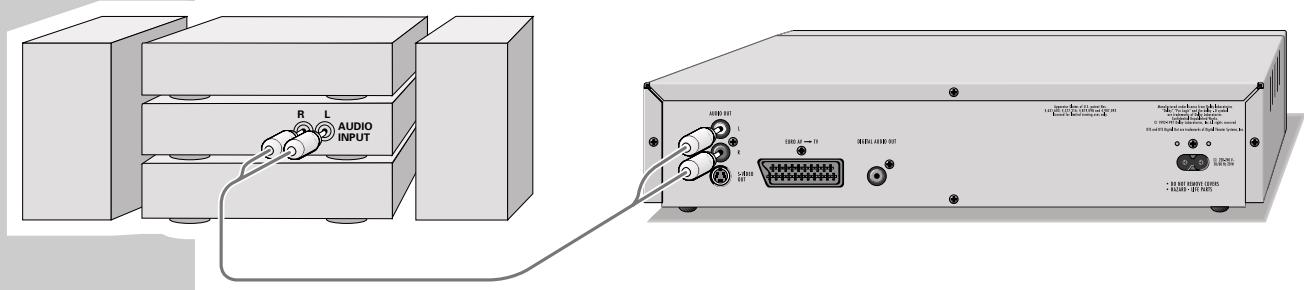
text_image
R L AUDIO INPUT AUDIO INPUT L E A 100000 AT — 74 100000 AT — 74 100000 AT — 74 + 36.825 200000 200000 + 46.825 200000 2000001 Plug a standard cinch cable into the »AUDIO OUT L R« sockets on the DVD player and into the appropriate sockets on the HiFi system.
Caution:
Do not connect the DVD player's »AUDIO OUT L R« sockets to the PHONO sockets (record player input) on the HiFi system.
Connecting the power cord
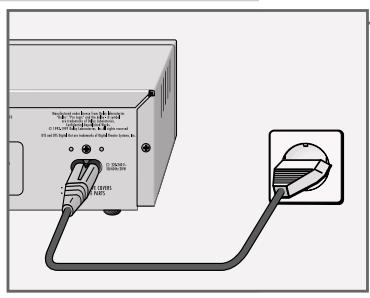
text_image
Diagram showing connection between a device with labeled ports and cable, including a plug inserted into a socket.1 Plug the power cord supplied into the »220-240V\~« socket on the back of the the DVD player.
2 Insert the power cord plug into the socket.
Caution:
The only way to disconnect the DVD player from the mains supply is to pull the plug.
Inserting batteries in the remote control
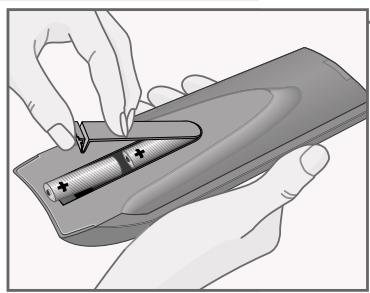
natural_image
Illustration of hands holding a battery inside a device (no text or symbols visible)1 Open the battery compartment by pressing the snap-catch, and remove the lid.
2 When inserting the batteries (mignon type, for example, LR 6 or AA 2 x 1.5 V), observe the polarity marked on the battery compartment.
Note:
If the DVD player no longer reacts properly to remote control commands, the batteries may be flat. Always remove flat batteries. No liability is accepted for damage resulting from leaking batteries.
Environmental note:
Batteries, including those which are heavy metal-free, may not be disposed of with household waste. Please dispose of used batteries in an environmentally sound manner. Find out about the legal regulations which apply in your area.
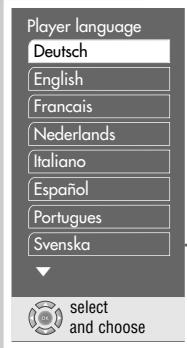
Setting the language
When the DVD player is first operated, the »Player language« menu appears automatically. You can now choose the language of the user guide. When this is selected, the language of the DVD menu and the dubbed language are automatically set in the same language.
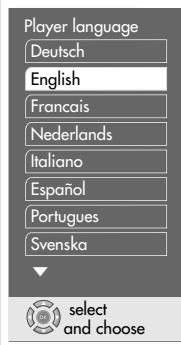
text_image
Player language Deutsch English Francais Nederlands Italiano Español Portugues Svenska select and choose1 Select the desired language for the screen menus using »▲« or »▼« and press »OK« to confirm.
Note:
If this setting is not confirmed with »OK«, the »Player language« menu appears when the system is switched on again.
You can change these settings at any time after first operating the system, see the settings in the "Selecting the language of the screen menu" chapter on page 27 and in the "Language settings" chapter on page 29.
Adapting the DVD player to the television set
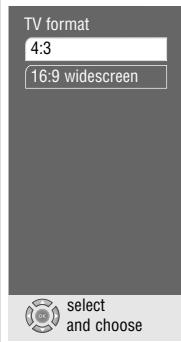
Selecting the screen format of your television set
If your television has a 16:9 screen format, then select the »16 : 9« setting. These default settings also have an influence on the settings in the »Picture« menu item.
On a conventional television set with a 4:3 screen format, select the »4 : 3« setting.
text_image
TV format 4:3 16:9 widescreen select and choose1 Press »i« to call up the main menu.
2 Select the »Player menu« menu with »▼« or »▲« activate with »OK«, or select directly using »1 ... 0«.
3 Select the »TV format« line with »▼« or »▲« and activate with »OK«.
4 Select the screen format required (4:3 or 16:9 wide screen) with »▼« or »▲« and confirm with »OK«.
text_image
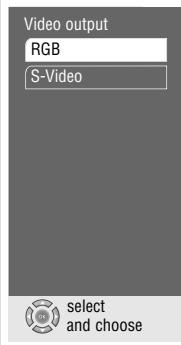
Video output RGB S-Video select and chooseSelecting the video output socket (RGB or S-Video)
1 Select the »Video output« line with »▼« or »▲« and activate with »OK«.
2 Select the desired video output (»RGB« for »EURO AV → TV« socket or »S-Video« for »S-VIDEO OUT« socket) with »▼« or »▲« and confirm with »OK«.
3 Press »i« to quit the menu.
DVD and video CD features


You can recognise DVDs, s-video CDs and video CDs by the logo on the label.
Depending on the contents of the DVD, s-video CD or video CD (films, video clips etc.), they may carry one or more titles.
Each title may contain one or more chapters. Titles and chapters can be selected easily and conveniently.
You can control and direct playback of a DVD, s-video CD or video CD using the menu of the DVD player on the television screen.
Some of the DVD player's functions, such as video strobe or slow motion, can not be selected when playing back a video CD. This depends on the video CD.

Special DVD features
DVDs have a title menu which provides an overview of the titles available and the passages they contain.
Some of the DVD player's functions, such as slow motion, freeze-frame and auto-play, can also be controlled by the DVD itself. It is therefore possible that the freeze-frame function, for example, cannot be selected during certain scenes.
Many DVDs have audio tracks recorded in up to eight languages.
This enables you to select the language you prefer.
Many DVDs are recorded by the manufacturer with subtitles in several languages. You can select subtitle superimposition from up to 32 different languages.
Since films are released in different parts of the world at different times, all DVD players world-wide are given a regional code. Your DVD player has been given region code 2.
DVDs can also be given a supplementary regional code. If you insert a DVD with different code to that of the DVD player, a reference to the regional code appears on the television screen. The DVD player will not be able to play back the DVD.
Before playback
Preparation
1 Switch on the television and select the channel for the DVD player.
2 If a HiFi system is connected to the DVD player, switch on the HiFi system and select the appropriate audio input for the DVD player.
3 Press » 🔊« to switch on the DVD player.
- On-screen display: »no disc«.
Note:
When the parental lock is activated, the » 🔒« display appears.
You must deactivate this lock. See the chapters on locking and releasing the disc compartment of the DVD player on page 22.
no disc
text_image
GRUNDIC X baro M M


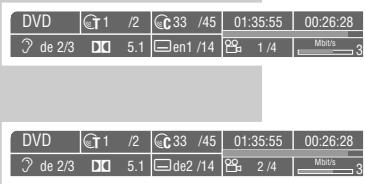
| DVD | T1 | /2 | C33 | /45 | 01:35:55 | 00:26:28 |
| en 1/3 | DQ | 5.1 | en1 | /14 | 2 /4 | Mbit/s |
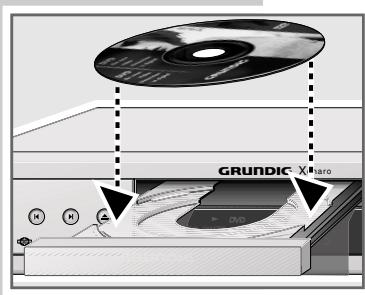
Inserting a DVD/video CD
1 Press »▲« on the DVD player.
– The disc tray opens.
2 Insert the desired DVD/video CD in the disc tray with the label facing upwards.
3 Press »▲«.
- DVD-player display: »DVD«, or »VCD«, the current chapter and the elapsed playing time of the DVD or Video-CD.
Playback starts automatically.
Note:
If the DVD/video CD has not been authorised, the rating must be changed. (See the chapter on the parental lock on page 23).
If the » ⊗« symbol appears on the television screen, then the selected function is not possible with this DVD/video CD.
Playing back a title
1 After the disc compartment closes and the DVD is scanned, playback starts automatically.
2 To pause playback (freeze-frame), press »ll«.
3 Press »▶ « again to resume playback.
4 End playback by pressing »■«.
Note:
Depending on the DVD/video CD you are using, you may have to select a title or chapter from the DVD's/video CD's table of contents.
Use the »▲«, »▼«, »◀« or »▶« buttons to select it and then press »OK« to confirm.
If the selection is numbered, use the »1 ... 0« keys.
Calling up information
You can call up information on the title, chapter and playing time for display on the screen.
1 Press »OK« to see the Info line.
- This provides information on: The type of disc, current title number, current chapter number, playing time, remaining playing time, language options, audio system, subtitle language, camera position and bit rate.
2 Press »OK« to hide the Info line.
Selecting titles or chapters
| DVD | T1 | /2 | C33 | /45 | 01:35:55 | 00:26:28 |
| en 1/3 | DQ | 5.1 | en1 | /14 | 2 /4 | Mbit/s |


If a DVD or video CD contains several titles and/or chapters, you can select from among them. The »©T«and »©C« boxes in the info line will tell you whether a DVD contains more than one title or chapter.
1 Call up the contents of the DVD/video CD by pressing » ©«.
– If the DVD/video CD has a title menu, it will appear on the screen.
2 If the selection options are numbered, select the desired title and section using »1 ... 0«.
3 If the options are not numbered, select titles and sections with »▲«, »▼«, »◀« or »▶«, and activate with »OK«.
– Playback begins with title/chapter selected.
Selecting chapters ...
... using the numerical buttons of the remote control
1 Select the desired chapter using »1 ... 0« and confirm with »OK«. – Playback begins with the chapter selected.
Note:
Incorrect entries can be deleted by pressing »←«.
... step by step
1 To select the next chapter, press »▶|« during playback.
2 Return to the beginning of the chapter by pressing »|« once.
3 To select the previous chapter, press »|« twice.
– Playback begins with the chapter selected.
Interrupting and resuming playback
The playback of a DVD/video CD can be interrupted at any point and then resumed from the same place.
1 Interrupt playback by pressing » ■ « once only.
2 Resume playback at the same point by pressing »▶«.
Ending playback
Playback of a DVD or video CD automatically stops at the end of a title. You can stop playback at any point by pressing » ■ « twice.
Removing the DVD/video CD
1 Press »▲« on the DVD player to open the disc tray.
Additional playback functions
Note:
The sound is muted with the "frame-search", "slow-motion" and "freeze-frame" functions.
Some functions can not be selected. This depends on the DVD/video CD being used.
natural_image
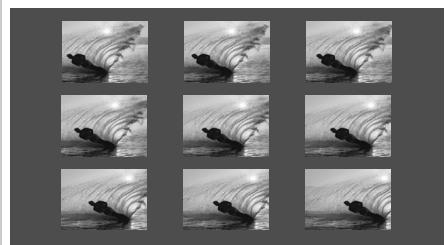
Grid of nine black-and-white photos showing silhouetted figures in water, no text or symbols presentVideo strobe
With this effect, individual video frames of the DVD are shown on the screen after each other in groups of nine. During this function, which can be used to analyse the pictures, all the picture movement functions can be selected.
1 During playback, press and hold down »▶« to switch on the function.
2 Resume playback by pressing »▶«.
Video search
You can choose from among four different speeds (forwards or reverse).
1 During playback, select the desired playback speed with » ◀◀« or » ▶▶«. You can select a speed which is two, four, eight or twenty times faster, forwards or reverse.
Note:
With »|« or »▶|« on the device (press and hold down), only a video search twenty times quicker is possible.
2 Resume playback by pressing »▶«.
Slow motion
You can choose from among four different speeds (forwards or reverse).
1 During playback, press »«.
2 Select desired slow motion speed (1/20, 1/8, 1/4, 1/2) by pressing » ◀◀« or » ▶▶«.
3 Resume playback by pressing »▶«.
Frame-by-frame playback
1 During playback, press » «.
2 Move the freeze frame step by step backwards or forwards with »|« or »|«.
3 Resume playback by pressing »▶«.

text_image
X 2 X 8 1/20 1/4 X 4 20 20 1/2 1/8

text_image
DVD 1 /2 33 /45 01:35:55 00:26:28 de 2/3 5.1 len1 /14 1 /4 Mbit/s 3 DVD 1 /2 33 /45 01:35:55 00:26:28 de 2/3 5.1 de2 /14 2 /4 Mbit/s
Repeating a chapter or a DVD
These functions repeat the currently running chapter or the entire DVD.
1 During playback, press and hold down » ↔ «.
- » ↔ ©C« appears on the television screen, the chapter is repeated.
2 During playback, press » ↔ « and afterwards press it again.
- » ↔ ©« appears on the television screen, the DVD is repeated.
3 To quit this function, press » « again.
Repeating a selected scene (A-B Repeat)
You can use this function to select the beginning and end of a scene, and then play it over and over.
1 During playback, mark the beginning of the scene by briefly pressing » ↔ « – » A« appears on the television screen.
2 To mark the end of the scene, press » ↔ « again briefly.
- » ↔ A-B« appears on the television screen, the marked scene is repeated continuously.
3 To quit this function, press » ↔ « again.
Selecting the camera angle for particular scenes or passages
Many DVDs contain scenes or passages which were filmed several times from different camera angles.
You can choose from among these different angles.
If the DVD offers this function, » 1/4« appears on the television screen in the info line.
1 During playback press » 📄 to select the camera angle function.
– The camera angle » 📄 2/4« appears in the display, 2 of 4 in this example.
2 Select a different camera angle by pressing » 📁 <<.
Enlarging the picture (Zoom)
1 During playback or pause, press » 🔍 «.
- Display: » ⊕ X2«, the DVD player enlarges a section of the screen.
2 You can move the screen section by pressing »◀«, »▶«, »▲« or »▼«.
3 To return to normal picture size, press » 📄 « again.
text_image
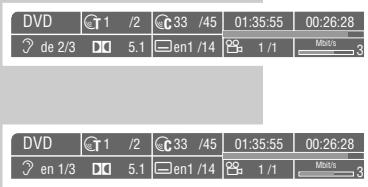
DVD 1 /2 33 /45 01:35:55 00:26:28 de 2/3 5.1 len1 /14 1 /1 Mobs/ DVD 1 /2 33 /45 01:35:55 00:26:28 en 1/3 5.1 len1 /14 1 /1 Mobs/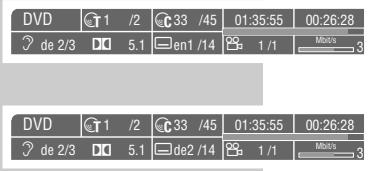
text_image
DVD 1 /2 C 33 /45 01:35:55 00:26:28 de 2/3 5.1 en1 /14 1 /1 Mobs/ DVD 1 /2 C 33 /45 01:35:55 00:26:28 de 2/3 5.1 de2 /14 1 /1 Mobs/
Changing the dubbed language
This setting switches out of the preset dubbed language, when the DVD offers alternatives.
1 During playback, press » ⚙«.
- Display: for example » de 2/3 : ☐☐ 5.1« appears briefly, and the current dubbed language is displayed.
2 To set the desired language, press » 📋« repeatedly.
Selecting and displaying subtitles
If the current DVD provides subtitles, they can be displayed on your TV screen. When subtitles in several languages are available, you can select your language of choice.
1 During playback, press » — «.
- Display: for example » ☐ de 2/14« appears briefly, and the current dubbed language is displayed.
2 To set the language for the subtitles, press » — « repeatedly.
Note:
To switch off the subtitles, keep pressing »—« until »—« appears in the display, or press and hold down »—«.
Selecting and playing scenes
You can mark a scene on the DVD, which you can then select directly during playback. The bookmark is retained when you remove the DVD. You can give up to 5 DVDs a bookmark.
Setting a mark
1 During playback, press » «.
Note:
This mark is deleted automatically when you set a new mark.
Playing selected scenes
1 During playback, press and hold down »
- Playback starts at the point marked.
no disc
△
text_image
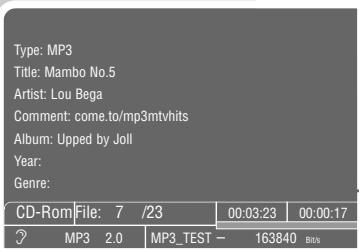
Type: MP3 Title: Mambo No.5 Artist: Lou Bega Comment: come.to/mp3mtvhits Album: Upped by Joll Year: Genre: CD-Rom File: 7 /23 00:03:23 00:00:17 ? MP3 2.0 MP3_TEST - 163840 BitsCT 2
Preparation
1 Switch on the television and select the channel for the DVD player.
2 If a HiFi system is connected to the DVD player, switch on the HiFi system and select the appropriate audio input for the DVD player.
3 Press » ⏻ « to switch on the DVD player.
- On-screen display »no disc«.
Inserting an MP3-CD
1 Press »▲« on the DVD player.
2 Insert the MP3 CD in the disc compartment, with the labelling facing upwards.
3 Press »▲«.
- The DVD player displays the number of titles and the playing time of the MP3-CD.
- A menu appears on the screen showing the content of the MP3 CD.
Playback
1 Select the folder or track required with » ▲ « or » ▼ «.
Note:
A folder can contain tracks, which can be called up with »OK«.
2 Start track playback with »▶«.
- The number of the track and the playing time appears in the display on the DVD player.
Note:
For information about the MP3 CD, press »TITLE«.
To see the contents of the MP3 CD, press » ◎ «.
3 To pause playback, press » «.
4 Press »▶« again to resume playback.
Selecting a different track
1 To select the next track, press »▶|« during playback.
2 To select the previous track, press »|◀« during playback.
Selecting a different folder and other tracks
This can be done if the MP3 CD contains several folders.
1 Press » © « to call up the Contents menu (file browser).
2 Press »■« to end playback.
3 If the Contents menu displays tracks, press »◀« to switch back one level.
4 Select the folder by pressing » ▲ « or » ▼ «.
Note:
If you want to play all the tracks in a folder, press »▶«.
5 Press »▶« to see the tracks in the folder.
6 Press »▲« or »▼« to select the track you want to hear and then »▶« to start playback.
Ending playback
1 End playback by pressing »■«.
Removing an MP3-CD
1 Press »▲« on the DVD player to open the disc tray.

Audio CD features

An audio CD is identified by this logo.
Audio CDs contain only music recordings. They can be played in the normal manner on a HiFi system.
Before playback
Preparation
1 Switch on the television and select the channel for the DVD player.
- With this you can see the DVD player's displays.
2 If a HiFi system is connected to the DVD player, switch on the HiFi system and select the appropriate audio input for the DVD player.
3 Press » 🔊« to switch on the DVD player.
- Display on the DVD player and television »no disc«.
Inserting an audio CD
1 Press »▲« on the DVD player.
- The disc tray opens.
2 Insert the audio CD in the disc tray, with the labelling facing upwards.
3 Press »▲«.
- The CD is loaded.
- The DVD player displays the number of tracks and the total playing time of the CD.
Calling up the info line
1 Press »OK« to call up the info line.
- The info line is displayed. Here you find information about the CD, including the number of tracks, the playing time of the tracks, the playing time remaining, the audio system and the data flow.
Audio functions
Playing back a track
1 Start playback with »▶ «.
– Playback stops automatically at the end of the CD.
2 To pause playback, press » ||«.
3 Press »▶ « again to resume playback.

flowchart
graph TD
    A["2"] --> B["2"]
    B --> C["4"]
    C --> D["1"]
    D --> E["1"]
    E --> F["1"]
    F --> G["1"]
    G --> H["1"]
    H --> I["1"]
    I --> J["1"]
    J --> K["1"]
    K --> L["1"]
    L --> M["1"]
    M --> N["1"]
    N --> O["1"]
    O --> P["1"]
    P --> Q["1"]
    Q --> R["1"]
    R --> S["1"]
    S --> T["1"]
    T --> U["1"]
    U --> V["1"]
    V --> W["1"]
    W --> X["1"]
    X --> Y["1"]
Selecting a different track
1 To select the next track, press »▶|« during playback.
2 Return to the beginning of the track by pressing »|« once.
3 To select previous track, press »|« twice.
- Playback begins with the track selected.
4 To select a track directly, enter the one or two-digit number of the track with »1 ... 0« and press »OK« to confirm.
Interrupting and resuming playback
The playback of a CD can be interrupted at any point and then resumed from the same place.
1 Interrupt playback by pressing »■« once only.
2 Resume playback at the same point by pressing »▶«.
Ending playback
Playback of the CD stops automatically at the end of the last track. You can stop playback at any point by pressing » ■ « twice.
Repeating a title or an audio CD
These functions repeat the track currently being played or the entire audio CD.
1 Press and hold down »←« during playback.
- »←T« appears on the television screen, the track is repeated.
2 During playback, press » ↔ « and afterwards press again.
- »← Ⓞ« appears on the television screen, the audio CD is repeated.
3 To quit this function, press » « again.
With the parental lock you can:
- Lock the disc tray of the DVD player.
- Block scenes which are not appropriate for children from DVDs or video CDs, or select alternative scenes.
Locking and releasing the disc tray of the DVD player
text_image
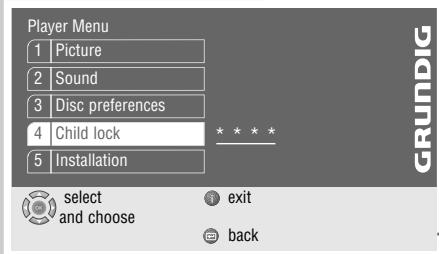
Player Menu 1 | Picture 2 | Sound 3 | Disc preferences 4 | Child lock 5 | Installation select and choose exit back GRUNDIGLocking the disc tray of the DVD player
1 Press »i« to call up the main menu.
2 Select the »Child lock« line with »▼« or »▲« and activate with »OK«, or select directly with »1 ... 0«.
3 Enter »1« »9« »9« »9« with the number keys.
- The »Child lock« menu is displayed, the parental lock status (»On« or »Off«) is shown.
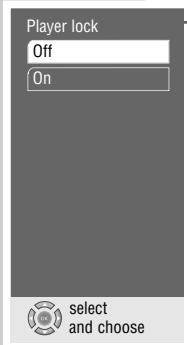
4 Select the »Player lock« line with »▼« or »▲« and activate with »OK«.
5 Lock the DVD player with » ▲ « or » ▼ « (»On«) and confirm with »OK«.
6 Press »i« to quit the menu.
Note:
The »▲« button on the DVD player is locked and »®« is displayed each time it is pushed. A disc in the DVD player can be played.
Releasing the disc tray of the DVD player
1 To release the disc tray, repeat steps 2 to 5 in the "Locking the disc tray on the DVD player" chapter, select the »Off« display with »▲« or »▼« and confirm with »OK«.
text_image
Player lock Off On select and chooseAuthorising the contents of a DVD
Films on DVD may be wholly or partially unsuitable for children. Such DVDs contain information which identifies these scenes, providing them with ratings from 1 to 8. You can select one of the ratings and thereby authorise alternative scenes for playback.

text_image
Child lock 1 | Content control 2 | Player lock Off select and choose exit back1 Press »i« to call up the main menu.
2 Select the »Child lock« line with »▼« or »▲« and activate with »OK«, or select directly using »1 ... 0«.
3 Enter »1« »9« »9« »9« with the number keys.
- The »Child lock« menu is displayed, the parental lock status (»On« or »Off«) is shown.
4 Activate the »Country control« line with »OK«.
5 Activate the »Country« line with »OK«.
6 Select the country with »▼« or »▲« and activate with »OK«.
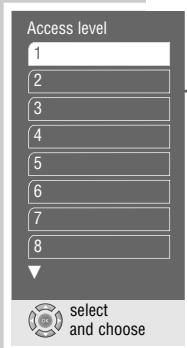
7 Select the »Access level« line with »▼« or »▲« and activate with »OK«.
8 Select the desired rating (from »1« to »8«) using »▼« or »▲«, and activate with »OK«.
9 Press »i« to quit the menu.
text_image
Access level 1 2 3 4 5 6 7 8 select and chooseSurround sound settings
You can select different 3D surround sound effects including Dolby virtual surround sound. Dolby virtual surround is a process which appears to provide sound all around the listener via only two loudspeakers.
Note:
You can select these settings if you have connected analogue two-channel stereo sound to your HiFi system.
Selecting surround sound effects
1 Press »i« to call up the main menu.
2 Select the »Sound« menu with »▼« or »▲« and confirm with »OK«, or select directly with »1 ... 0«.
3 Select the »Surround Sound« line with »▼« or »▲« and activate with »OK«.
4 Select the »Effects« line with »▼« or »▲« and activate with »OK«.
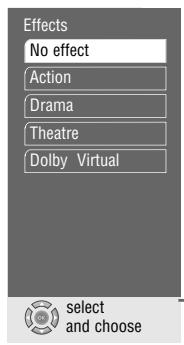
5 Select the desired surround sound setting (»Action«, »Drama«, »Theatre«, »Dolby Virtual«) with »▼« or »▲« and press »OK« to confirm.
Note:
When the »No effect« line is selected, the surround sound setting is switched off.
Selecting the intensity of the surround sound effects
1 Select the »Intensity« line with »▼« or »▲« and activate with »OK«.
2 Select the desired intensity (»Low«, »Medium« or »High«) with »▼« or »▲« and press »OK« to confirm.
3 Press »i« to quit the menu.
text_image
Effects No effect Action Drama Theatre Dolby Virtual select and choose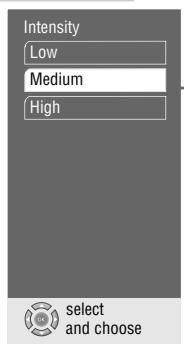
text_image
Intensity Low Medium High select and chooseSelecting the picture format for your television
This setting is dependent on the chosen TV format, see the "Selecting the screen format for your television" chapter on page 11.
If 4:3 format is selected, you can set:
»Pan&Scan« for wide-screen playback using the full height of the screen, but with the left and right edges of the picture cropped.
»Letterbox« for wide-screen playback with black bars on the top and bottom edges of the screen
If 16:9 format is selected, you can set:
»Use TV settings« for resetting the format by the television set.
»Automatic« for adapting the picture format automatically by the DVD player.
»Original« for 4:3 playback with black bars on the left and right edges of the screen.
»Cinema zoom«, where the picture is enlarged to the width of the screen, and the upper and lower edges of the picture are cropped.
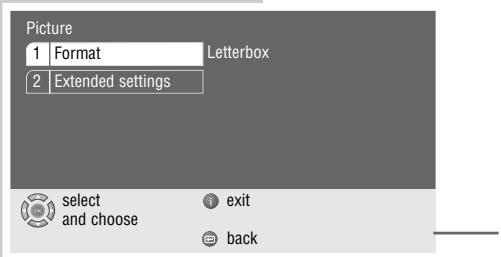
text_image
Picture 1 Format Letterbox 2 Extended settings select and choose exit back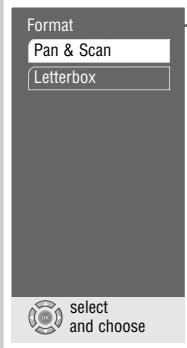
text_image
Format Pan & Scan Letterbox select and choose1 Press »i« to call up the main menu.
2 Select the »Picture« menu with »▼« or »▲« activate with »OK«, or select directly with »1 ... 0«.
3 Select the »Format« line with »▼« or »▲« and activate with »OK«.
4 Select the desired setting for 4:3 format (»Pan&Scan« or »Letterbox«) with »▼« or »▲« and press »OK« to confirm;
or
select the desired setting for 16:9 widescreen format (»Use TV settings«, »Automatic«, »Original« or »Cinema zoom«) with »▼« or »▲« and press »OK« to confirm.
5 Press »i« to quit the menu.
Selecting filter functions
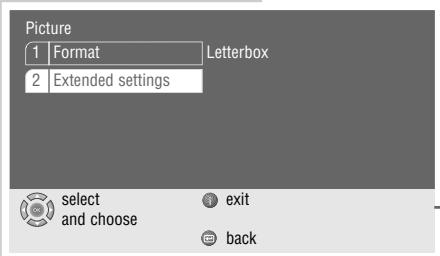
text_image
Picture 1 | Format | Letterbox 2 | Extended settings select and choose exit back1 Press »i« to call up the main menu.
2 Select the »Picture« menu with »▼« or »▲«activate with »OK«, or select directly with »1 ... 0«.
3 Select the »Extended settings« line with »▼« or »▲« and activate with »OK«.
Note:
For further operation, see the following sections, each one starting from Step 1.
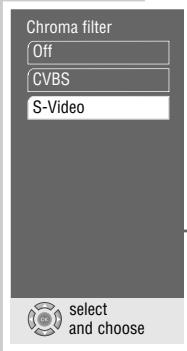
Adapting the colour bandwidth
Here you adapt the colour bandwidth in order to avoid disturbance or flickering in the colour reproduction. You can choose between »Off«, »CVBS« and »S- Video«. This depends on the video signal.
text_image
Chroma filter Off CVBS S-Video select and choose1 Select the »Chroma filter« line with »▼« or »▲« and activate with »OK«.
2 Select the desired setting (»CVBS« or »S-VIDEO«) with »▼« or »▲« and press »OK« to confirm.
Note:
When the »Off« line is selected, the colour filter is switched off.
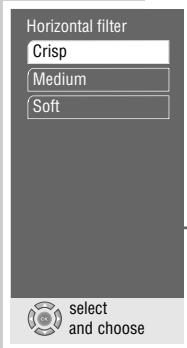
Selecting the horizontal filter
This setting optimises the soft focus function, computer graphics and photos when playing back.
text_image
Horizontal filter Crisp Medium Soft select and choose1 Select the »Horizontal filter« line with »▼« or »▲« and activate with »OK«.
2 Select the desired setting (»Crisp«, »Medium« or »Soft«) with »▼« or »▲« and press »OK« to confirm.
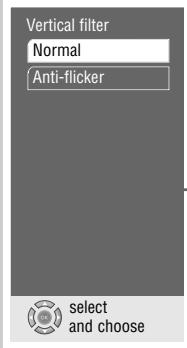
Vertical filter
This setting optimises the flicker-reduced reproduction of freeze frames when playing back.
text_image
Vertical filter Normal Anti-flicker select and choose1 Select the »Vertical filter« line with »▼« or »▲« and activate with »OK«.
2 Select the desired setting (»Normal« or »Anti-flicker«) with »▼« or »▲« and press »OK« to confirm.
3 Press »i« to quit the menu.
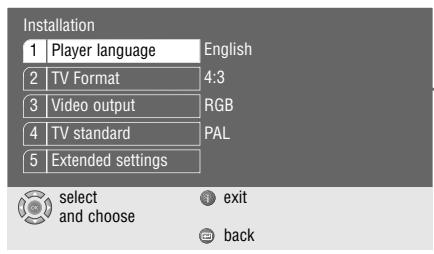
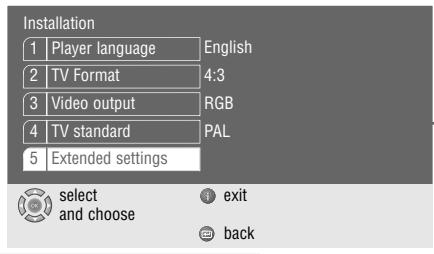
Settings in the »Player menu« menu
text_image
Installation 1 Player language English 2 TV Format 4:3 3 Video output RGB 4 TV standard PAL 5 Extended settings select exit and choose back1 Press »i« to call up the main menu.
2 Select the »Player menu« menu with »▼« or »▲« and activate with »OK«, or
select directly using »1 ... 0«.
Note:
For further operation, see the following sections, each one starting from Step 1.
text_image
Player language Deutsch English Français Nederlands Italiano Español Portugues Svenska select and chooseSelecting the language of the screen menu
With this you set the language of the DVD player's screen menu.
1 Select the »Player language« line with »▼« or »▲« and activate with »OK«.
2 Select the desired language with »▼« or »▲« and confirm with »OK«.
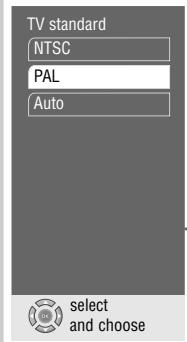
Setting the TV system
The colour norm of the DVD player's screen menus has to be adapted to the format of the television.
Select »NTSC« for televisions with NTSC norm, »PAL« for televisions with PAL norm, and »Auto« for televisions with multi-norm.
text_image
TV standard NTSC PAL Auto select and choose1 Select the »TV standard« line with »▼« or »▲« and activate with »OK«.
2 Select the desired setting (»NTSC«, »PAL« or »Auto«) with »▼« or »▲« and press »OK« to confirm.
3 Press »i« to quit the menu.
Setting the screen menu and display of the DVD player
text_image
Installation 1 Player language English 2 TV Format 4:3 3 Video output RGB 4 TV standard PAL 5 Extended settings select exit and choose back1 Press »i« to call up the main menu.
2 Select the »Player menu« menu with »▼« or »▲« activate with »OK«, or select directly with »1 ... 0«.
3 Select the »Extended settings« line with »▼« or »▲« and activate with »OK«.
Note:
For further operation, see the following sections, each one starting from Step 1.
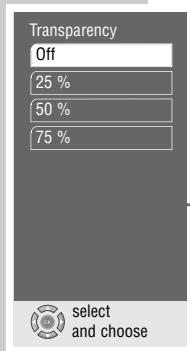
text_image
Transparency Off 25 % 50 % 75 % select and chooseSelecting the transparency of the screen menus
1 Select »Onscreen display« by pressing »▼« or »▲« and then press »OK« to activate it.
2 Activate the »Transparency« line with »OK«.
3 Select the desired setting (25%, 50% oder 75%) with »▼« or »▲« and press »OK« to confirm.
Note:
When the »Off« line is selected, the screen menus have a solid background.
4 Return to the »Extended settings« menu by pressing »←«.
Setting the DVD player display
With these settings you can expand the DVD player's display and adjust the brightness.
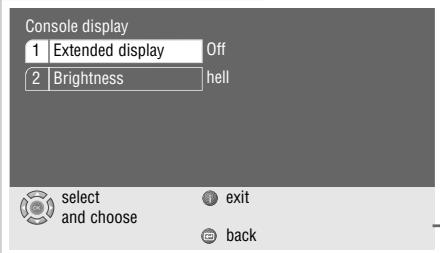
text_image
Console display 1 Extended display Off 2 Brightness hell select and choose exit back1 Select the »Console display« line with »▼« or »▲« and activate with »OK«.
2 Select the »Extended display« line with »▼« or »▲« and activate with »OK«.
3 Select the desired setting (»On« or »Off«) with »▼« or »▲« and press »OK« to confirm.
4 Select the »Brightness« line with »▼« or »▲« and activate with »OK«.
5 Select the desired setting (»Bright«, »Medium« or »Dark«) with »▼« or »▲« and press »OK« to confirm.
6 Return to the »Extended settings« menu by pressing »←«.
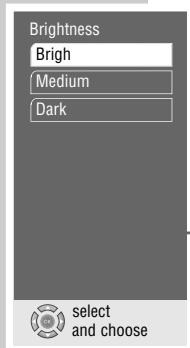
text_image
Brightness Brigh Medium Dark select and chooseSoftware status and dealer menu
Here you can get information about your DVD player's software version. The »Dealer Service menu« line is reserved for the authorised dealer.
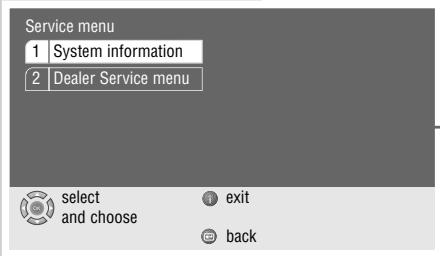
text_image
Service menu 1 | System information 2 | Dealer Service menu select and choose exit back1 Select the »Dealer Service menu« line by pressing »▼« or »▲« and then press »OK« to activate it.
2 Select the »System informationen« line by pressing »▼« or »▲« and then press »OK« to activate it.
3 Press »i« to quit the menu.
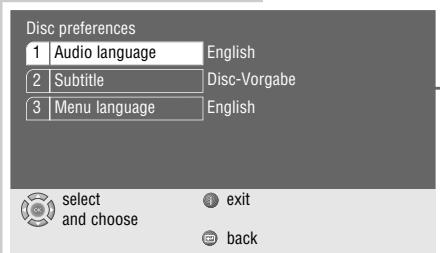
Language settings
text_image
Disc preferences 1 | Audio language | English 2 | Subtitle | Disc-Vorgabe 3 | Menu language | English select and choose exit back1 Press »i« to call up the main menu.
2 Select the »Disc preferences« menu with »▼« or »▲« and activate with »OK«, or select directly using »1 ... 0«.
Note:
For further operation, see the following sections, each one starting from Step 1.
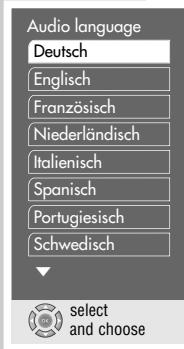
Selecting the dubbed language
If several languages are available on the current DVD, the sound is played back in the language you have selected.
If the language you select is not on the DVD, the first dubbed language available is automatically selected.
1 Select the »Audio language« line by pressing »▼« or »▲« and then press »OK« to activate it.
2 Select the desired dubbed language with »▼« or »▲« and confirm with »OK«.
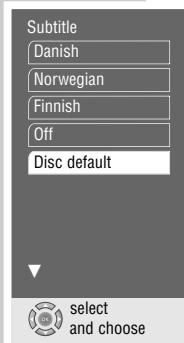
text_image
Subtitle Danish Norwegian Finnish Off Disc default select and chooseSelecting the language for the subtitles
If subtitles are available on the current DVD, they are played back in the language you have selected.
If the language you have selected for the subtitles is not on the DVD, the first language available is automatically selected.
1 Select the »Subtitle« line with »▼« or »▲« and activate with »OK«
2 Select the desired language with »▼« or »▲« and activate with »OK«.
Note:
When the »Off« line is selected, the subtitles are not displayed.
text_image
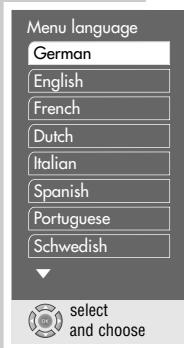
Menu language German English French Dutch Italian Spanish Portuguese Schwedish select and chooseSelecting the language of the DVD menus
If a DVD has menus in several languages, you can select the language of your choice.
1 Select the »Menu language« line with »▼« or »▲« and activate with »OK«.
2 Select the desired language for the DVD menus using »▼« or »▲« and press »OK« to confirm.
3 Press »i« to switch off the menu.
USING EXTERNAL DEVICES
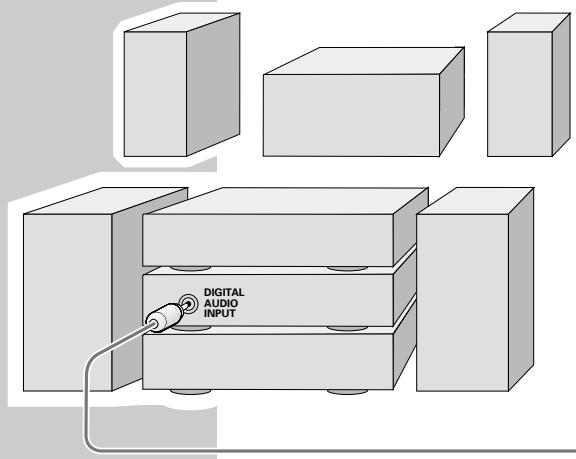
Connecting to a digital multi-channel amplifier
The digital multi-channel sound of a DVD can best be decoded and played with a multi-channel audio/video amplifier (Dolby* digital decoder or DTS).
text_image
DIGITAL AUDIO INPUT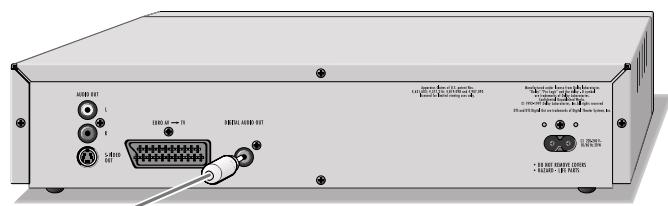
text_image
I/O port L F S-8010 I/O → I I/O port A/O port B I/O port A/O port C I/O port A/O port B + 15.000 V/200V (100V) + 15.000 V/200V (100V) + 15.000 V/200V (100V)1 Plug a standard cinch cable into the »DIGITAL AUDIO OUT« socket of the DVD player and into the appropriate socket on the digital multi-channel amplifier.
* Manufactured under license from Dolby Laboratories Licensing Corporation. "Dolby", "Dolby Pro Logic", "AC 3" and the double-D symbol "☐☐" are trademarks of the Dolby Laboratories Licensing Corporation. Copyright 1992 Dolby Laboratories, Inc. All rights reserved.
Connecting to a HiFi system with digital two-channel stereo sound (PCM)
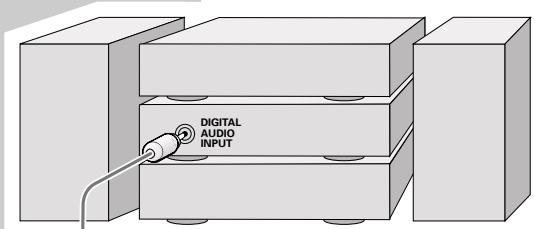
text_image
DIGITAL AUDIO INPUT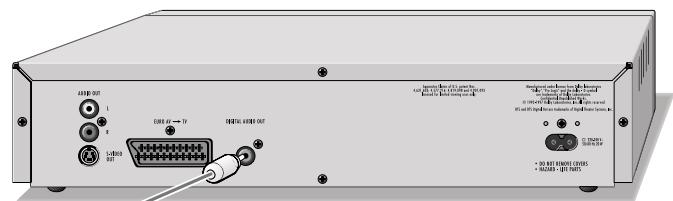
text_image
USB-025 L X L18003 OUT DINJ 40 → TV HENSOLI AIRB OUT SARANTIC BOSO (2.1) - 2000 Pcs R100000000000000000000000000000000000000000000000000000000000000 + 50 MHz (HON/OFF) (GND) + 55 MHz (HON/OFF)1 Plug a standard cinch cable into the »DIGITAL AUDIO OUT« sockets on the DVD player and into the appropriate sockets on the HiFi system.
Note:
The correct digital output format must be set on the DVD player. For this, you must observe the settings in the "Adapting the digital output to a digital multi-channel amplifier" chapter starting on page 31.
Adapting the digital output to a digital multi-channel amplifier
With this you choose whether the decoder signal is processed in the unit or fed unchanged to the digital output. With internal decoding, there is a stereo signal (PCM) at the digital output.
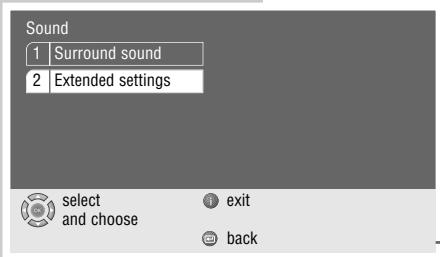
text_image
Sound 1 Surround sound 2 Extended settings select and choose exit back1 Press »i« to call up the main menu.
2 Select the »Sound« menu with »▼« or »▲« activate with »OK«, or select directly with »1 ... 0«.
3 Select the »Extended settings« line with »▼« or »▲« and activate with »OK«.
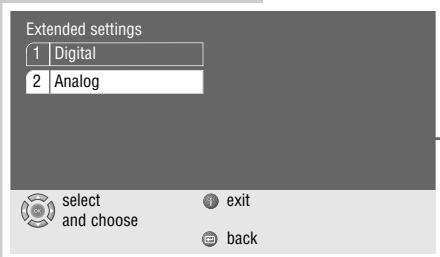
4 Select the »Digital« line with »▼« or »▲« and activate with »OK«.
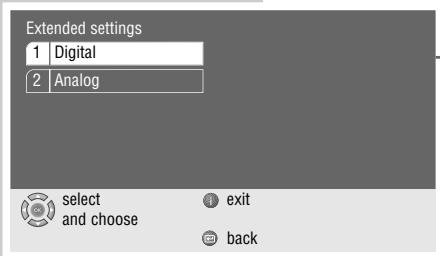
text_image
Extended settings 1 Digital 2 Analog select and choose exit backNote:
For further operation, see the following sections, each one starting from Step 1.
Selecting audio signal types for the digital output
The audio signal type must be selected according to the connected decoder/amplifier.
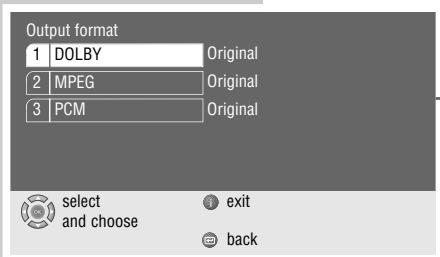
text_image
Output format 1 | DOLBY | Original 2 | MPEG | Original 3 | PCM | Original select and choose exit back1 Select the »Output format« line with »▼« or »▲« and activate with »OK«.
2 Select the required output format, (»DOLBY« »MPEG«, or »PCM«) with »▼« or »▲« and confirm with »OK«.
3 Select the audio signal type (»Original« or »PCM«) with »▼« or »▲« and then press »OK« to confirm.
4 Return to the »Digital« menu by pressing »←«.
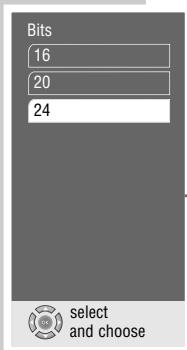
Setting the bit rate
Here you choose the possible digital resolution and the dynamic range possible of the output signal in order to adapt the signal to the decoder.
1 Select the »Bits« line with »▼« or »▲« and activate with »OK«.
2 Select the desired value (»16«, »20« or »24«) with »▼« or »▲« and press »OK« to confirm.
text_image
Bits 16 20 24 select and choose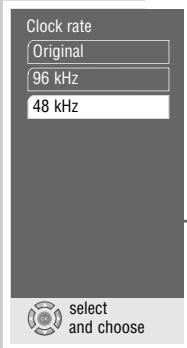
text_image
Clock rate Original 96 kHz 48 kHz select and chooseSetting the sampling rate.
This function is used to limit the sampling rate of the digital multi-channel amplifier.
1 Select the »Abtastrate« line with »▼« or »▲« and press »OK« to activate the function.
- This has been set to »48 kHz« at the factory.
2 Select the desired value (»Original«, »96 kHz« or »48 kHz«) with »▼« or »▲« and confirm with »OK«.
- Use »Original« for DVDs with a 96 kHz sound signal.
The sound signal is output at the »AUDIO OUT L R« sockets and – if supported by the DVD – at the »DIGITAL AUDIO OUT« socket.
- Use »96 kHz« for DVDs with a 96 kHz sound signal for optimum analogue sound output at the »AUDIO OUT L R« sockets. No sound signal at the »DIGITAL AUDIO OUT« socket.
- Use »48 kHz« for DVDs with a 48 kHz sound signal.
The signal is output at the »AUDIO OUT L R« socket and at the »DIGITAL AUDIO OUT« socket. THE 96 kHz sound signal is converted into 48 kHz.

text_image
Digital 1 | Output format | 2 | Bits 24 3 | Clock rate Original 4 | Output level 0 dB select exit and choose backSetting the digital output level
With this setting, the output level can be adapted to the volume of other external sound sources.
1 Select the »Output level« line with »▼« or »▲« and activate with »OK«.
2 Change the output level set by step (from »0dB« to »20dB«) with »▼« or »▲«, or with »◀« and »▶« in 10 steps, and press »OK« to confirm.
3 Press »i« to quit the menu.
Adapting the analogue output to the HiFi system
With this you set the output level of the audio signal and the audio operation type (stereo, surround sound or Dolby Pro Logic).
text_image
Extended settings 1 Digital 2 Analog select and choose exit back1 Press »i« to call up the main menu.
2 Select the »Sound« menu with »▼« or »▲« activate with »OK« or select directly using »1 ... 0«.
3 Select the »Extended settings« line with »▼« or »▲« and activate with »OK«.
4 Select the »Analog« line with »▼« or »▲« and activate with »OK«.
Note:
For further operation, see the following sections, each one starting from Step 1.
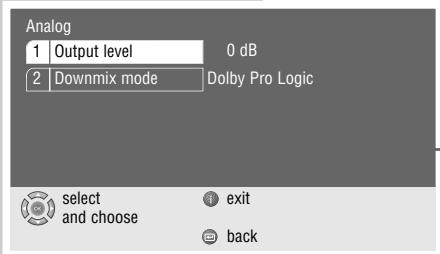
text_image
Analog 1 | Output level 0 dB 2 | Downmix mode Dolby Pro Logic select exit and choose backSetting the output level
1 Select the »Output level« line with »▼« or »▲« and activate with »OK«.
2 Change the output level set by step (from »0dB« to »20dB«) with »▼« or »▲«, or with »◀« and »▶« in increments of 10, and press »OK« to confirm.
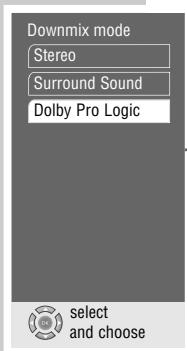
text_image
Downmix mode Stereo Surround Sound Dolby Pro Logic select and chooseSelecting the audio mode
1 Select the »Downmix mode« line with »▼« or »▲« and activate with »OK«.
2 Select the desired mode (»Stereo«, »Surround Sound« or »Dolby Pro Logic«) with »▼« or »▲« and press »OK« to confirm.
3 Press »i« to leave the menu.
TELEVISION REMOTE CONTROL
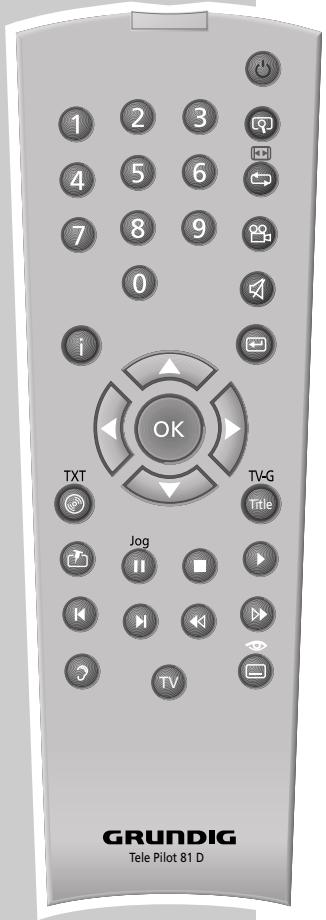
text_image
1 2 3 4 5 6 7 8 9 0 i OK TXT Jog TV-G Title TV GRUNDIG Tele Pilot 81 DYou can also operate GRUNDIG televisions with this remote control. The functions available to you depend on the model of the GRUNDIG television.
Point the remote control directly at the TV.
| TV | Switches the remote control to television operation.To do this, press and hold down »TV« then press the relevant button for the desired function. |
| 💡 | Switches off the television set (stand-by). |
| 1 ... 0 | Switches the television off, stand-by on.Selects the television channel directly. »O« selects the channel position »RV« .In video text operation: for entering the three-figure page number. |
| 💡 | In television operation: inset picture in main picture. |
| 💡 ➔ ➔ ➔ ➔ ➔ ➔ ➔ ➔ ➔ ➔ ➔ ➔ ➔ ➔ ➔ ➔ ➔ ➔ ➔ ➔ ➔ ➔ ➔ ➔ ➔ ➔ ➔ ➔ ➔ ➔ ➔ ➔ ➔ ➔ ➔ ➔ ➔ ➔ ➔ ➔ ➔ ➔ ➔ ➔ ➔ ➔ ➔ ➔ ➔ ➔ ➕ ➕ ➕ ➕ ➕ ➕ ➕ ➕ ➕ ➕ ➕ ➕ ➕ ➕ ➕ ➕ ➕ ➕ ➕ ➕ ➕ ➕ ➕ ➕ ➕ ➕ ➕ ➕ ➕ ➕ ➕ ➕ ➕ ➕ ➕ ➕ ➕ ➕ ➕ ➕ ➕ ➕ ➕ ➕ ➕ ➕ ➕ ➕ ➕ ➕ ➤ ➕ ➕ ➕ ➕ ➕ ➕ ➕ ➕ ➕ ➕ ➕ ➕ ➕ ➕ ➕ ➕ ➕ ➕ ➕ ➕ ➕ ➕ ➕ ➕ ➕ ➕ ➕ ➕ ➕ ➕ ➕ ➕ ➕ ➕ ➕ ➕ ➕ ➕ ➕ ➕ ➕ ➕ ➕ ➕ ➕ ➕ ➕ ➕ ➕ ➔ ➕ ➕ ➕ ➕ ➕ ➕ ➕ ➕ ➕ ➕ ➕ ➕ ➕ ➕ ➕ ➕ ➕ ➕ ➕ ➕ ➕ ➕ ➕ ➕ ➕ ➕ ➕ ➕ ➕ ➕ ➕ ➕ ➕ ➕ ➕ ➕ ➕ ➕ ➕ ➕ ➕ ➕ ➕ ➕ ➕ ➕ ➕ ➕ ➤ ➤ ➤ ➤ ➤ ➤ ➤ ➤ ➤ ➤ ➤ ➤ ➤ ➤ ➤ ➤ ➤ ➤ ➤ ➤ ➤ ➤ ➤ ➤ ➤ ➤ ➤ ➤ ➤ ➤ ➤ ➤ ➤ ➤ ➤ ➤ ➤ ➤ ➤ ➤ ➤ ➤ ➤ ➤ ➤ ➤ ➤ ➤ ➤ ➤ ➵ ➤ ➤ ➤ ➤ ➤ ➤ ➤ ➤ ➤ ➤ ➤ ➤ ➤ ➤ ➤ ➤ ➤ ➤ ➤ ➤ ➤ ➤ ➤ ➤ ➤ ➤ ➤ ➤ ➤ ➤ ➤ ➤ ➤ ➤ ➤ ➤ ➤ ➤ ➤ ➤ ➤ ➤ ➤ ➤ ➤ ➤ ➤ ➤ ➤ ➢ ➢ ➢ ➢ ➢ ➢ ➢ ➢ ➢ ➢ ➢ ➢ ➢ ➢ ➢ ➢ ➢ ➢ ➢ ➢ ➢ ➢ ➢ ➢ ➢ ➢ ➢ ➢ ➢ ➢ ➢ ➢ ➢ ➢ ➢ ➢ ➢ ➢ ➢ ➢ ➢ ➢ ➢ ➢ ➢ ➢ ➢ ➢ ➢ ➢ ➣ ➢ ➢ ➢ ➢ ➢ ➢ ➢ ➢ ➢ ➢ ➢ ➢ ➢ ➢ ➢ ➢ ➢ ➢ ➢ ➢ ➢ ➢ ➢ ➢ ➢ ➢ ➢ ➢ ➢ ➢ ➢ ➢ ➢ ➢ ➢ ➢ ➢ ➢ ➢ ➢ ➢ ➢ ➢ ➢ ➢ ➢ ➢ ➢ ➢ ➡ ➢ ➢ ➢ ➢ ➢ ➢ ➢ ➢ ➢ ➢ ➢ ➢ ➢ ➢ ➢ ➢ ➢ ➢ ➢ ➢ ➢ ➢ ➢ ➢ ➢ ➢ ➢ ➢ ➢ ➢ ➢ ➢ ➢ ➢ ➢ ➢ ➢ ➢ ➢ ➢ ➢ ➢ ➢ ➢ ➢ ➢ ➢ ➢ ➢ ➤ ➤ ➤ ➤ ➤ ➤ ➤ ➤ ➤ ➤ ➤ ➤ ➤ ➤ ➤ ➤ ➤ ➤ ➤ ➤ ➤ ➤ ➤ ➤ ➤ ➤ ➤ ➤ ➤ ➤ ➤ ➤ ➤ ➤ ➤ ➤ ➤ ➤ ➤ ➤ ➤ ➤ ➤ ➤ ➤ ➤ ➤ ➤ ➤ ➞ ➞ ➞ ➞ ➞ ➞ ➞ ➞ ➞ ➞ ➞ ➞ ➞ ➞ ➞ ➞ ➞ ➞ ➞ ➞ ➞ ➞ ➞ ➞ ➞ ➞ ➞ ➞ ➞ ➞ ➞ ➞ ➞ ➞ ➞ ➞ ➞ ➞ ➞ ➞ ➞ ➞ ➞ ➞ ➞ ➞ ➞ ➞ ➞ ➞ ➝ ➝ ➝ ➝ ➝ ➝ ➝ ➝ ➝ ➝ ➝ ➝ ➝ ➝ ➝ ➝ ➝ ➝ ➝ ➝ ➝ ➝ ➝ ➝ ➝ ➝ ➝ ➝ ➝ ➝ ➝ ➝ ➝ ➝ ➝ ➝ ➝ ➝ ➝ ➝ ➝ ➝ ➝ ➝ ➝ ➝ ➝ ➝ ➝ ➝ ➞ ➞ ➞ ➞ ➞ ➞ ➞ ➞ ➞ ➞ ➞ ➞ ➞ ➞ ➞ ➞ ➞ ➞ ➞ ➞ ➞ ➞ ➞ ➞ ➞ ➞ ➞ ➞ ➞ ➞ ➞ ➞ ➞ ➞ ➞ ➞ ➞ ➞ ➞ ➞ ➞ ➞ ➞ ➞ ➞ ➞ ➞ ➞ ➞ ➛ ➛ ➛ ➛ ➛ ➛ ➛ ➛ ➛ ➛ ➛ ➛ ➛ ➛ ➛ ➛ ➛ ➛ ➛ ➛ ➛ ➛ ➛ ➛ ➛ ➛ ➛ ➛ ➛ ➛ ➛ ➛ ➛ ➛ ➛ ➛ ➛ ➛ ➛ ➛ ➛ ➛ ➛ ➛ ➛ ➛ ➛ ➛ ➛ ➛ ➦ ➛ ➛ ➛ ➛ ➛ ➛ ➛ ➛ ➛ ➛ ➛ ➛ ➛ ➛ ➛ ➛ ➛ ➛ ➛ ➛ ➛ ➛ ➛ ➛ ➛ ➛ ➛ ➛ ➛ ➛ ➛ ➛ ➛ ➛ ➛ ➛ ➛ ➛ ➛ ➛ ➛ ➛ ➛ ➛ ➛ ➛ ➛ ➛ ➛ ➜ ➜ ➜ ➜ ➜ ➜ ➜ ➜ ➜ ➜ ➜ ➜ ➜ ➜ ➜ ➜ ➜ ➜ ➜ ➜ ➜ ➜ ➜ ➜ ➜ ➜ ➜ ➜ ➜ ➜ ➜ ➜ ➜ ➜ ➜ ➜ ➜ ➜ ➜ ➜ ➜ ➜ ➜ ➜ ➜ ➜ ➜ ➜ ➜ ➜ ➖ ➜ ➜ ➜ ➜ ➜ ➜ ➜ ➜ ➜ ➜ ➜ ➜ ➜ ➜ ➜ ➜ ➜ ➜ ➜ ➜ ➜ ➜ ➜ ➜ ➜ ➜ ➜ ➜ ➜ ➜ ➜ ➜ ➜ ➜ ➜ ➜ ➜ ➜ ➜ ➜ ➜ ➜ ➜ ➜ ➜ ➜ ➜ ➜ ➜ ➞ ➜ ➜ ➜ ➜ ➜ ➜ ➜ ➜ ➜ ➜ ➜ ➜ ➜ ➜ ➜ ➜ ➜ ➜ ➜ ➜ ➜ ➜ ➜ ➜ ➜ ➜ ➜ ➜ ➜ ➜ ➜ ➜ ➜ ➜ ➜ ➜ ➜ ➜ ➜ ➜ ➜ ➜ ➜ ➜ ➜ ➜ ➜ ➜ ➜ ➤ ➚ ➚ ➚ ➚ ➚ ➚ ➚ ➚ ➚ ➚ ➚ ➚ ➚ ➚ ➚ ➚ ➚ ➚ ➚ ➚ ➚ ➚ ➚ ➚ ➚ ➚ ➚ ➚ ➚ ➚ ➚ ➚ ➚ ➚ ➚ ➚ ➚ ➚ ➚ ➚ ➚ ➚ ➚ ➚ ➚ ➚ ➚ ➚ ➚ ➚ ➞ ➞ ➞ ➞ ➞ ➞ ➞ ➞ ➞ ➞ ➞ ➞ ➞ ➞ ➞ ➞ ➞ ➞ ➞ ➞ ➞ ➞ ➞ ➞ ➞ ➞ ➞ ➞ ➞ ➞ ➞ ➞ ➞ ➞ ➞ ➞ ➞ ➞ ➞ ➞ ➞ ➞ ➞ ➞ ➞ ➞ ➞ ➞ ➞ ➢ ➚ ➚ ➚ ➚ ➚ ➚ ➚ ➚ ➚ ➚ ➚ ➚ ➚ ➚ ➚ ➚ ➚ ➚ ➚ ➚ ➚ ➚ ➚ ➚ ➚ ➚ ➚ ➚ ➚ ➚ ➚ ➚ ➚ ➚ ➚ ➚ ➚ ➚ ➚ ➚ ➚ ➚ ➚ ➚ ➚ ➚ ➚ ➚ ➚ ➢ ➚ ➚ ➚ ➚ ➚ ➚ ➚ ➚ ➚ ➚ ➚ ➚ ➚ ➚ ➚ ➚ ➚ ➚ ➚ ➚ ➚ ➚ ➚ ➚ ➚ ➚ ➚ ➚ ➚ ➚ ➚ ➚ ➚ ➚ ➚ ➚ ➚ ➚ ➚ ➚ ➚ ➚ ➚ ➚ ➚ ➚ ➚ ➚ ➢ ➢ ➢ ➢ ➢ ➢ ➢ ➢ ➢ ➢ ➢ ➢ ➢ ➢ ➢ ➢ ➢ ➢ ➢ ➢ ➢ ➢ ➢ ➢ ➢ ➢ ➢ ➢ ➢ ➢ ➢ ➢ ➢ ➢ ➢ ➢ ➢ ➢ ➢ ➢ ➢ ➢ ➢ ➢ ➢ ➢ ➢ ➢ ➢ ➞ ➢ ➢ ➢ ➢ ➢ ➢ ➢ ➢ ➢ ➢ ➢ ➢ ➢ ➢ ➢ ➢ ➢ ➢ ➢ ➢ ➢ ➢ ➢ ➢ ➢ ➢ ➢ ➢ ➢ ➢ ➢ ➢ ➢ ➢ ➢ ➢ ➢ ➢ ➢ ➢ ➢ ➢ ➢ ➢ ➢ ➢ ➢ ➢ ➢ ➓ ➢ ➢ ➢ ➢ ➢ ➢ ➢ ➢ ➢ ➢ ➢ ➢ ➢ ➢ ➢ ➢ ➢ ➢ ➢ ➢ ➢ ➢ ➢ ➢ ➢ ➢ ➢ ➢ ➢ ➢ ➢ ➢ ➢ ➢ ➢ ➢ ➢ ➢ ➢ ➢ ➢ ➢ ➢ ➢ ➢ ➢ ➢ ➢ ➢ ➨ ➢ ➢ ➢ ➢ ➢ ➢ ➢ ➢ ➢ ➢ ➢ ➢ ➢ ➢ ➢ ➢ ➢ ➢ ➢ ➢ ➢ ➢ ➢ ➢ ➢ ➢ ➢ ➢ ➢ ➢ ➢ ➢ ➢ ➢ ➢ ➢ ➢ ➢ ➢ ➢ ➢ ➢ ➢ ➢ ➢ ➢ ➢ ➢ ➢ ➩ ➢ ➢ ➢ ➢ ➢ ➢ ➢ ➢ ➢ ➢ ➢ ➢ ➢ ➢ ➢ ➢ ➢ ➢ ➢ ➢ ➢ ➢ ➢ ➢ ➢ ➢ ➢ ➢ ➢ ➢ ➢ ➢ ➢ ➢ ➢ ➢ ➢ ➢ ➢ ➢ ➢ ➢ ➢ ➢ ➢ ➢ ➢ ➢ ➢ ➸ ≈ ≈ ≈ ≈ ≈ ≈ ≈ ≈ ≈ ≈ ≈ ≈ ≈ ≈ ≈ ≈ ≈ ≈ ≈ ≈ ≈ ≈ ≈ ≈ ≈ ≈ ≈ ≈ ≈ ≈ ≈ ≈ ≈ ≈ ≈ ≈ ≈ ≈ ≈ ≈ ≈ ≈ ≈ ≈ ≈ ≈ ≈ ≈ ≈ ≈ ≉ ≈ ≈ ≈ ≈ ≈ ≈ ≈ ≈ ≈ ≈ ≈ ≈ ≈ ≈ ≈ ≈ ≈ ≈ ≈ ≈ ≈ ≈ ≈ ≈ ≈ ≈ ≈ ≈ ≈ ≈ ≈ ≈ ≈ ≈ ≈ ≈ ≈ ≈ ≈ ≈ ≈ ≈ ≈ ≈ ≈ ≈ ≈ ≈ ≈ ≊ ≈ ≈ ≈ ≈ ≈ ≈ ≈ ≈ ≈ ≈ ≈ ≈ ≈ ≈ ≈ ≈ ≈ ≈ ≈ ≈ ≈ ≈ ≈ ≈ ≈ ≈ ≈ ≈ ≈ ≈ ≈ ≈ ≈ ≈ ≈ ≈ ≈ ≈ ≈ ≈ ≈ ≈ ≈ ≈ ≈ ≈ ≈ ≈ ≈ ≌ ≈ ≈ ≈ ≈ ≈ ≈ ≈ ≈ ≈ ≈ ≈ ≈ ≈ ≈ ≈ ≈ ≈ ≈ ≈ ≈ ≈ ≈ ≈ ≈ ≈ ≈ ≈ ≈ ≈ ≈ ≈ ≈ ≈ ≈ ≈ ≈ ≈ ≈ ≈ ≈ ≈ ≈ ≈ ≈ ≈ ≈ ≈ ≈ ≈ ≂ ≈ ≈ ≈ ≈ ≈ ≈ ≈ ≈ ≈ ≈ ≈ ≈ ≈ ≈ ≈ ≈ ≈ ≈ ≈ ≈ ≈ ≈ ≈ ≈ ≈ ≈ ≈ ≈ ≈ ≈ ≈ ≈ ≈ ≈ ≈ ≈ ≈ ≈ ≈ ≈ ≈ ≈ ≈ ≈ ≈ ≈ ≈ ≈ ≈ ≇ ≈ ≈ ≈ ≈ ≈ ≈ ≈ ≈ ≈ ≈ ≈ ≈ ≈ ≈ ≈ ≈ ≈ ≈ ≈ ≈ ≈ ≈ ≈ ≈ ≈ ≈ ≈ ≈ ≈ ≈ ≈ ≈ ≈ ≈ ≈ ≈ ≈ ≈ ≈ ≈ ≈ ≈ ≈ ≈ ≈ ≈ ≈ ≈ ≈ ≏ ≈ ≈ ≈ ≈ ≈ ≈ ≈ ≈ ≈ ≈ ≈ ≈ ≈ ≈ ≈ ≈ ≈ ≈ ≈ ≈ ≈ ≈ ≈ ≈ ≈ ≈ ≈ ≈ ≈ ≈ ≈ ≈ ≈ ≈ ≈ ≈ ≈ ≈ ≈ ≈ ≈ ≈ ≈ ≈ ≈ ≈ ≈ ≈ ≈ ≄ ≈ ≈ ≈ ≈ ≈ ≈ ≈ ≈ ≈ ≈ ≈ ≈ ≈ ≈ ≈ ≈ ≈ ≈ ≈ ≈ ≈ ≈ ≈ ≈ ≈ ≈ ≈ ≈ ≈ ≈ ≈ ≈ ≈ ≈ ≈ ≈ ≈ ≈ ≈ ≈ ≈ ≈ ≈ ≈ ≈ ≈ ≈ ≈ ≈ ≆ ≈ ≆ ≆ ≆ ≆ ≆ ≆ ≆ ≆ ≆ ≆ ≆ ≆ ≆ ≆ ≆ ≆ ≆ ≆ ≆ ≆ ≆ ≆ ≆ ≆ ≆ ≆ ≆ ≆ ≆ ≆ ≆ ≆ ≆ ≆ ≆ ≆ ≆ ≆ ≆ ≆ ≆ ≆ ≆ ≆ ≆ ≆ ≆ ≆ ≆ ≆ ≃ ≈ ≈ ≈ ≈ ≈ ≈ ≈ ≈ ≈ ≈ ≈ ≈ ≈ ≈ ≈ ≈ ≈ ≈ ≈ ≈ ≈ ≈ ≈ ≈ ≈ ≈ ≈ ≈ ≈ ≈ ≈ ≈ ≈ ≈ ≈ ≈ ≈ ≈ ≈ ≈ ≈ ≈ ≈ ≈ ≈ ≈ ≈ ≈ ≈ ≐ ≈ ≈ ≈ ≈ ≈ ≈ ≈ ≈ ≈ ≈ ≈ ≈ ≈ ≈ ≈ ≈ ≈ ≈ ≈ ≈ ≈ ≈ ≈ ≈ ≈ ≈ ≈ ≈ ≈ ≈ ≈ ≈ ≈ ≈ ≈ ≈ ≈ ≈ ≈ ≈ ≈ ≈ ≈ ≈ ≈ ≈ ≈ ≈ ≈ ≋ ≈ ≈ ≈ ≈ ≈ ≈ ≈ ≈ ≈ ≈ ≈ ≈ ≈ ≈ ≈ ≈ ≈ ≈ ≈ ≈ ≈ ≈ ≈ ≈ ≈ ≈ ≈ ≈ ≈ ≈ ≈ ≈ ≈ ≈ ≈ ≈ ≈ ≈ ≈ ≈ ≈ ≈ ≈ ≈ ≈ ≈ ≈ ≈ ≈ ≁ ≈ ≈ ≈ ≈ ≈ ≈ ≈ ≈ ≈ ≈ ≈ ≈ ≈ ≈ ≈ ≈ ≈ ≈ ≈ ≈ ≈ ≈ ≈ ≈ ≈ ≈ ≈ ≈ ≈ ≈ ≈ ≈ ≈ ≈ ≈ ≈ ≈ ≈ ≈ ≈ ≈ ≈ ≈ ≈ ≈ ≈ ≈ ≈ ≈ ≍ ≈ |
CE
Technical data
This product fulfils the European directives 89/336/EEC, 73/23/EEC and 93/68/EEC.
This device conforms to the safety regulation DIN EN 60065 (VDE 0860) and therefore the international safety regulation IEC 60065.
You may not open the DVD player. The manufacturer accepts no liability for damage resulting from improper handling.
Mains voltage:
220 - 240V \~, 50/60 Hz
Audio format:
Digital: MPEG2/Dolby Digital, PCM, DTS
Power consumption:
Operating: approx. 20 W
Stand-by: ≤ 5 W
Analogue: Stereo sound, Dolby Pro Logic
Ambient temperature:
+10°C to +35°C
Audio:
Signal: Analogue
DVD: 48/96 kHz 4Hz-22/44 kHz
Video CD: 44.1 kHz 4Hz-20 kHz
Audio CD: 44.1 kHz 4Hz-20 kHz
Playback standard:
PAL, 50 Hz, 625 lines
NTSC, 60 Hz, 525 lines
Signal-to-noise ratio
(at 1 kHz): 95 dB
Sound volume
(at 1 kHz): 95 dB
Playback system:
DVD video, video CD, S video CD, MP3-CD, audio-CD
CD-R, CD-RW, DVD-R
Dimensions and weight:
Dimensions:
W x H x L 360 x 73 x 24.6 mm
Weight 2.4 kg
Laser:
Semiconductor laser
Wavelength 650 nm DVD
Wavelength 780 nm CD
CLASS 1 LASER PRODUCT

General instructions for laser devices
Your system is a CLASS 1 LASER PRODUCT. This means that the laser is designed in such a way as to ensure that the maximum permissible emission value cannot be exceeded under any circumstances.
Caution:
If operating devices or methods other than those specified here are employed, it may lead to dangerous exposure to emissions.
This device emits laser radiation. Because of the danger of eye injuries, the unit may only be opened or serviced by trained personnel.
If settings other than those specified here are employed or OTHER PROCEDURES are carried out, this may lead to dangerous radiation exposure.
This product contains components which are covered by certain U.S. patents or for other reasons are considered intellectual property of the Macrovision Corporation and other proprietors. Use of this protected technology must be approved by the Macrovision Company and is only permissible for private presentation at home or for other limited applications, where no special permission has been granted by Macrovision. Reproduction or disassembly of the device is prohibited.
Manufactured with permission from Dolby Laboratories. The "Dolby" label and the double-D logo "☐☐" are trademarks of Dolby Laboratories. Confidential unpublished material.
©1992-1997 Dolby Laboratories, Inc. All rights reserved.
When playing DTS-encoded CD's & DVD's, excessive noise will be exhibited from the analog stereo outputs. To avoid possible damage to the audio system, the consumer should take proper precautions when the analog stereo outputs of the DVD player is connected to an amplification system. To enjoy DTS Digital Surround playback, an external 5.1 channel DTS Digital Surround decoder system must be connected to the digital output (S/PDIF) of the DVD player.
"DTS" and "DTS Digital Out" are registered trademarks of Digital Theater Systems, Inc.
Rectifying minor problems
Not every picture or sound problem is caused by a defect in your DVD player. Impairment can also be caused by leads having been accidentally pulled out, damaged DVDs/CDs and worn-out batteries in the remote control.
If the following measures do not bring about satisfactory results, consult an authorised dealer.
| Fault | Cause/Remedy |
| DVD player does not respond to remote control | Point the remote control directly at the DVD player. |
| Remove all obstacles which may impair the path of the remote control signal. | |
| Check or replace the remote control batteries. | |
| No pictureDistorted picture | Check the video connection. |
| Make sure that there are no fingerprints on the DVD/CD, follow the cleaning instructions on this page. | |
| DVD/CD cannot be played | Check that the label on the DVD/CD is facing upwards. |
| Clean the DVD/CD. | |
| Check if the DVD/CD is damaged by testing it with another DVD/CD. | |
| No sound | Check the audio connections. |
| Try another playback source. | |
| Distorted sound from HiFi system | Ensure that the audio connections have not been connected at the phono input on the amplifier. |
Cleaning DVDs and CDs
Wipe the dirty DVD/CD with a cloth from the centre outwards in a straight line.
Do not use any solvents such as petrol, thinners, conventional cleaner or anti-static spray for vinyl records.
GRUNDIG Service
GRUNDIG Deutschland
text_image
Map of Europe with marked locations and dots, likely indicating specific countries or regions within the continent.GRUNDIG BELUX N.V.
Deltapark, Weihoek 3, Unit 3G
B-1930 Zaventem
+32/2-7 16 04 00
GRUNDIG UK LTD.
Elstree Way, Borehamwood, Herts, WD6 1RX
Unit 35, Woodside Park, Wood Street
Rugby, Warwickshire, CV21 2NP
2 Waverley Office Park, Old Naas Road
EIR Dublin 12
+3 53/1-4 50 97 17
GRUNDIG FRANCE S.A.
Steinacker Straße 28
CH 8302 Kloten
+41/1-8 15 81 11
GRUNDIG PORTUGUESA